Pipeline complète CI CD
² Pipeline complète CI/CD
Voir ici (tuto) : https://medium.com/@ahmed24khaled/devops-ci-cd-pipelinee-e5a067786c26
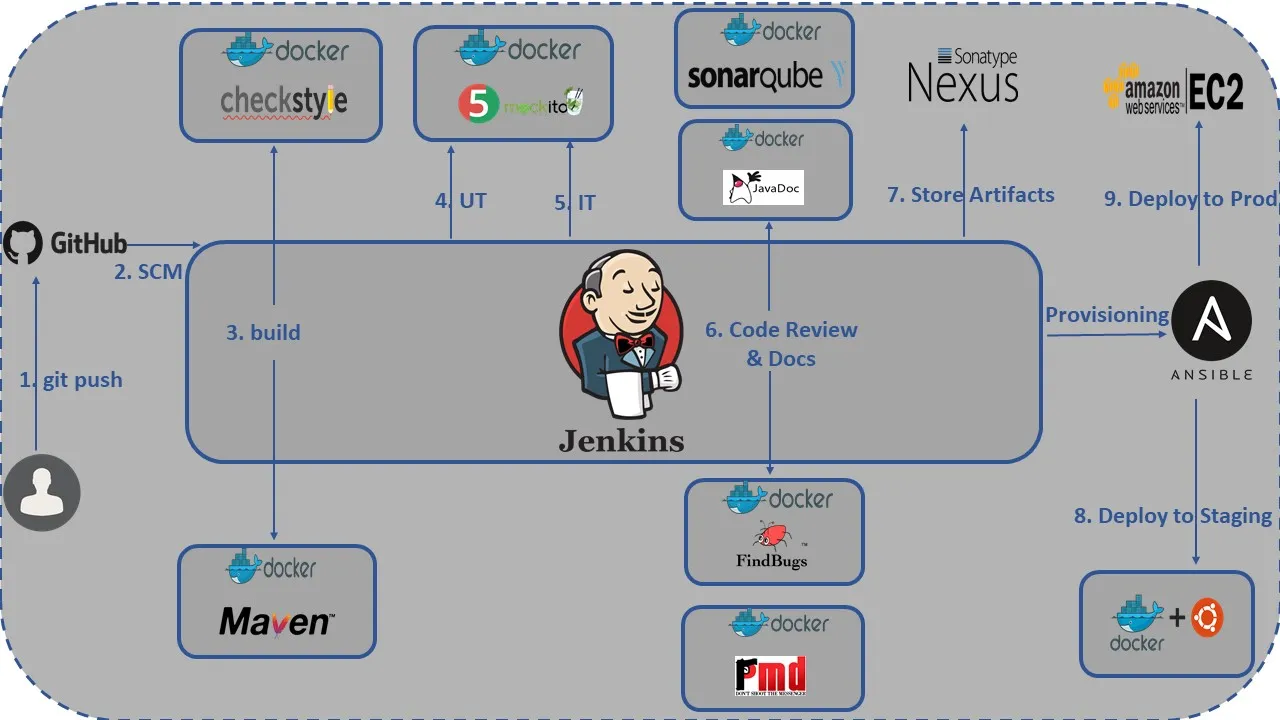
Ou ici pour celui de xavki https://xavki.blog/devops-tutos/
Jenkins
https://gitlab.com/xavki/pipeline-saison-1/-/blob/master/1.10-vagrant-srv/install_p1jenkins.sh Changer l'IP pour l'IP du registry :
#!/bin/bash

## install p1jenkins

IP=$(hostname -I | awk '{print $2}')

echo "START - install jenkins - "$IP

echo "[1]: install utils & ansible"
apt-get update -qq >/dev/null
apt-get install -qq -y git sshpass wget ansible gnupg2 curl >/dev/null


echo "[2]: install java & jenkins"
wget -q -O - https://pkg.jenkins.io/debian/jenkins.io.key | sudo apt-key add -
sudo sh -c 'echo deb https://pkg.jenkins.io/debian-stable binary/ > /etc/apt/sources.list.d/jenkins.list'
apt-get update -qq >/dev/null
apt-get install -qq -y default-jre jenkins >/dev/null
systemctl enable jenkins
systemctl start jenkins


echo "[2]: ansible custom"
sed -i 's/.*pipelining.*/pipelining = True/' /etc/ansible/ansible.cfg
sed -i 's/.*allow_world_readable_tmpfiles.*/allow_world_readable_tmpfiles = True/' /etc/ansible/ansible.cfg

echo "[3]: install docker & docker-composer"
curl -fsSL https://get.docker.com | sh; >/dev/null
usermod -aG docker jenkins # authorize docker for jenkins user
curl -sL "https://github.com/docker/compose/releases/download/1.25.0/docker-compose-$(uname -s)-$(uname -m)" -o /usr/local/bin/docker-compose
chmod +x /usr/local/bin/docker-compose

echo "[4]: use registry without ssl"
echo "
{
 \"insecure-registries\" : [\"192.168.5.5:5000\"]
}
" >/etc/docker/daemon.json
systemctl daemon-reload
systemctl restart docker

echo "END - install jenkins"
Base de donnée
Script :
#!/bin/bash
## install server postgre

IP=$(hostname -I | awk '{print $2}')

echo "START - install postgres - "$IP

echo "[1]: install postgres"
apt-get update -qq >/dev/null
apt-get install -qq -y vim git wget curl >/dev/null
apt-get install -qq -y postgresql-11 >/dev/null
sudo -u postgres bash -c "psql -c \"CREATE USER vagrant WITH PASSWORD 'vagrant';\""
sudo -u postgres bash -c "psql -c \"CREATE DATABASE dev OWNER vagrant;\""
sudo -u postgres bash -c "psql -c \"CREATE DATABASE stage OWNER vagrant;\""
sudo -u postgres bash -c "psql -c \"CREATE DATABASE prod OWNER vagrant;\""
sed -i "s/#listen_addresses = 'localhost'/listen_addresses = '*'/g" /etc/postgresql/11/main/postgresql.conf
sed -i "s/127.0.0.1\/32/0.0.0.0\/0/g" /etc/postgresql/11/main/pg_hba.conf
service postgresql restart

echo "END - install postgres"
Se connecter via Vagrant :
grep -ri ip:
sudo apt-get install postgresql-client
psql -h 192.168.10.44 -U vagrant dev
psql -h 192.168.10.44 -U vagrant stage
psql -h 192.168.10.44 -U vagrant prod
Grâce à la bdd on fera les tests unitaire/d'integration
Regsitry
Test depuis jenkins :
docker login https://192.168.10.47:5000
> systemctl restart docker.service
(Wed Mar-3 6:24:12pm)-(CPU 0.5%:0:Net 6)-(root:~)-(56K:8)
> docker login https://192.168.10.47:5000
Username: xavki
Password:
WARNING! Your password will be stored unencrypted in /root/.docker/config.json.
Configure a credential helper to remove this warning. See
https://docs.docker.com/engine/reference/commandline/login/#credentials-store

Login Succeeded
Gitlab
Initial root password
vim /etc/gitlab/initial_root_password
Maven
pom.xml = important
Pipeline
étape 1 :
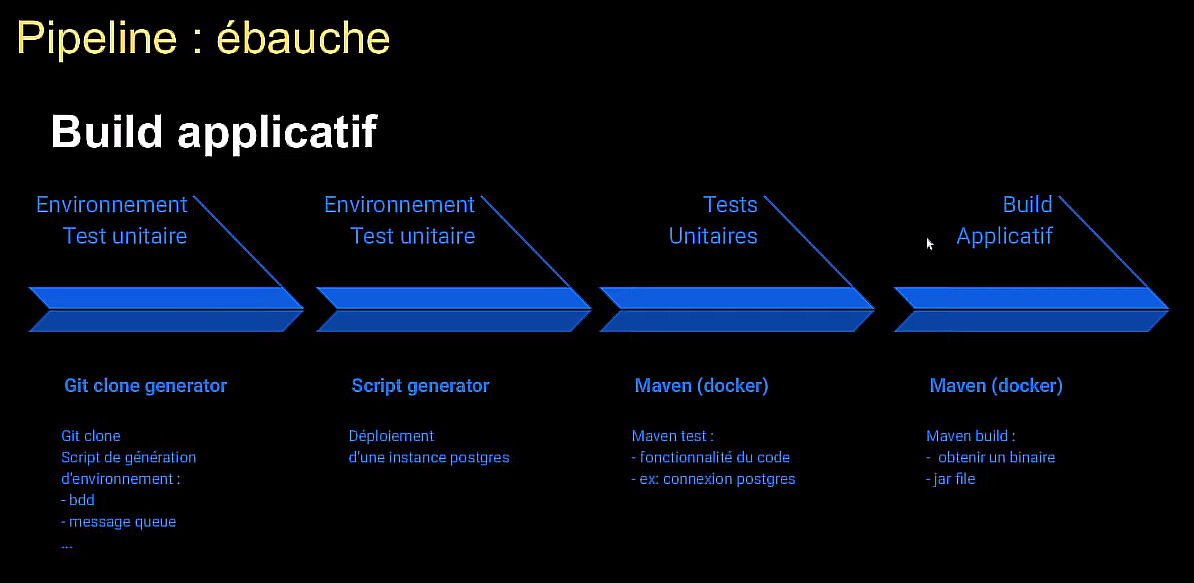
étape 2 :
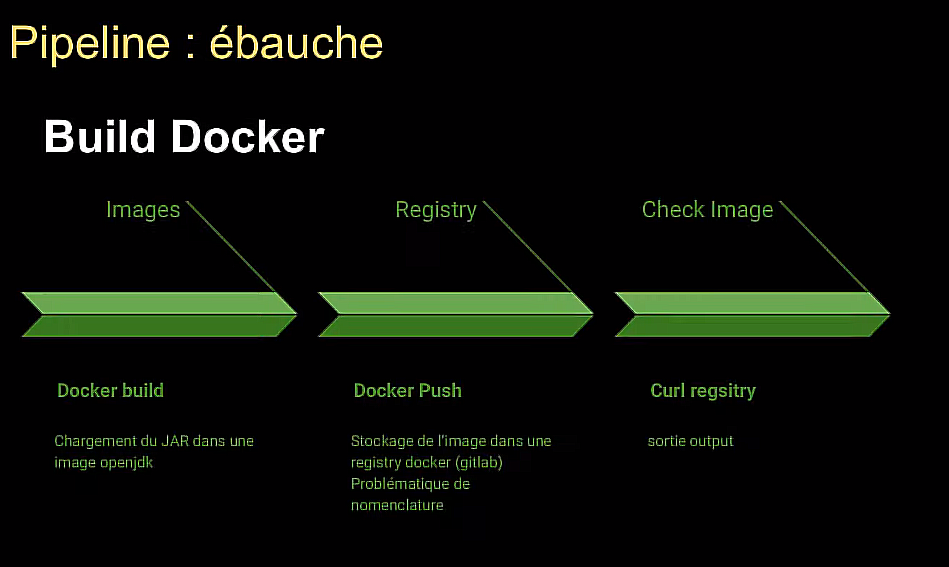
étape 3:
Tout sera généré par Jenkins avec un script type groovy qui s'appelle un pipeline
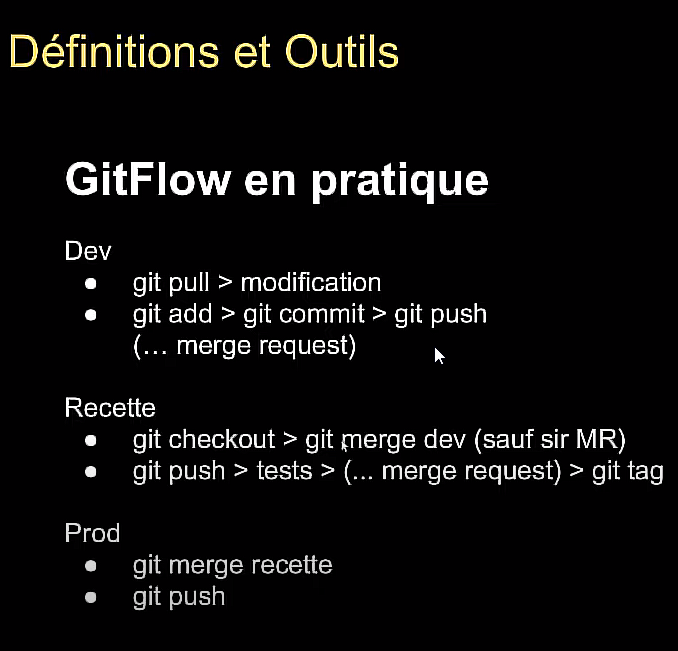
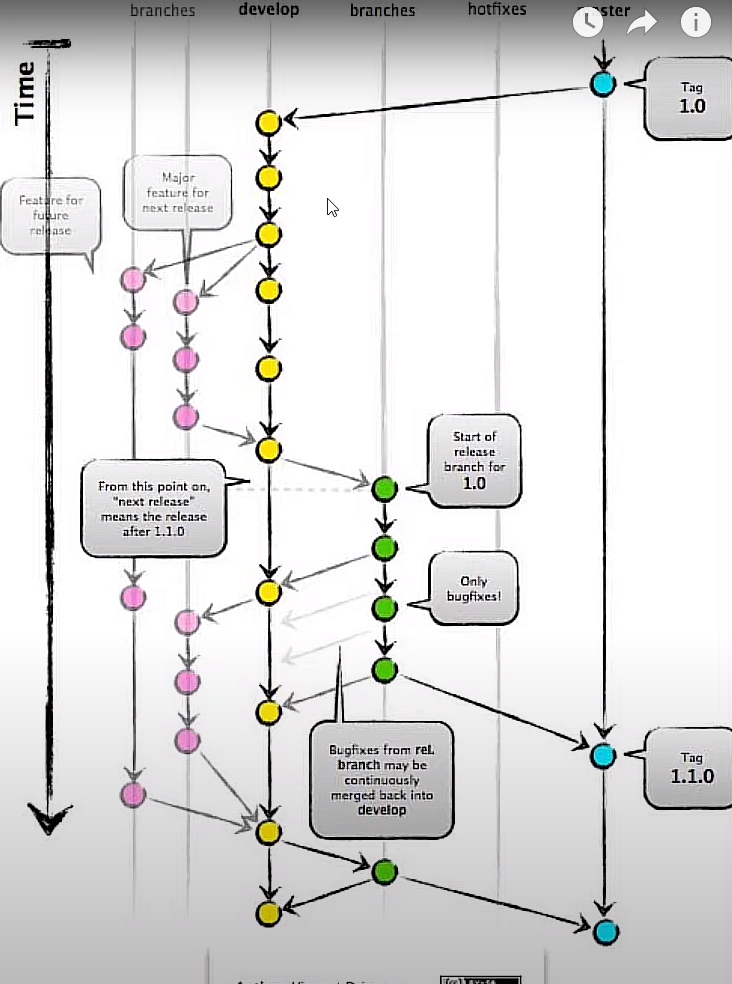
Git Git Flow
Organise le développement avec une ou plusieurs personnes.
4 branches :
- features : la ou les dev bossent qui bosses sur une ou des features
- dev : merger toutes les features dev au fur et a mesure
- release : quand le respo de la branche dev, la branche dev est mergé sur la branche release (independante de la branche dev)
- master : quand la branche release est bonne on merge vers le master avec un tag correspondant, prêt pour la mise en prod
Idéalement utiliser des merge request avec gitlab enterprise A adapter en fonction des devs. Voir : [[../GIT/GIT.md]]
1er dépôt
Stocker le code dans l'applicatif
cd myapp1
git init
git add .
git commit -m "initialisation"
git remote add origin git@gitlab-pipeline:mypipeline/myapp1.git
git remote show
git push -u origin master
git branch dev
git checkout dev
git push -u origin dev
git branch stage
git checkout stage
git push -u origin stage
git branch
On a fait le dépot applicatif ici mais nous aurons tout ces dépots plus tard :